PuTTY Install Notes

PuTTY is a free implementation of Telnet and SSH for Win32 and Unix platforms, along with an xterm terminal emulator. It is written and maintained primarily by Simon Tatham.

Installing PuTTY

Because PuTTY is continuously updated, you should download the latest version of the installer from http://www.chiark.greenend.org.uk/~sgtatham/putty/download.html (filename will be something like putty-0.58-installer.exe ) and install it on your machine. Once PuTTY is installed, double-click the icon created on your desktop or go to Start -> Programs -> PuTTY and start PuTTY.

Setting up sessions in PuTTY

  1. When starting PuTTY, you will see a dialog box. This dialog box allows you to control everything PuTTY can do. In the 'Host Name' box, enter xserver.delta.edu . Then type Delta in the "Saved Sessions" box. Finally, click the "Save" button.

    ex. 1

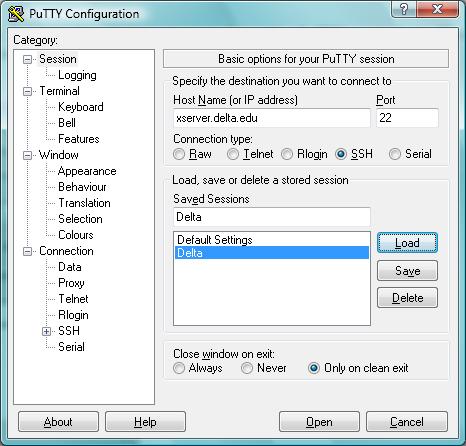
    There is no need to modify the other settings. Just make sure you save your configuration as instructed above.


  1. Now you can click the "Open" button or double-click the Putty icon you've installed. You will see a window similar to one below: You will need to enter your Delta ID and password at the prompt to access the Linux server.

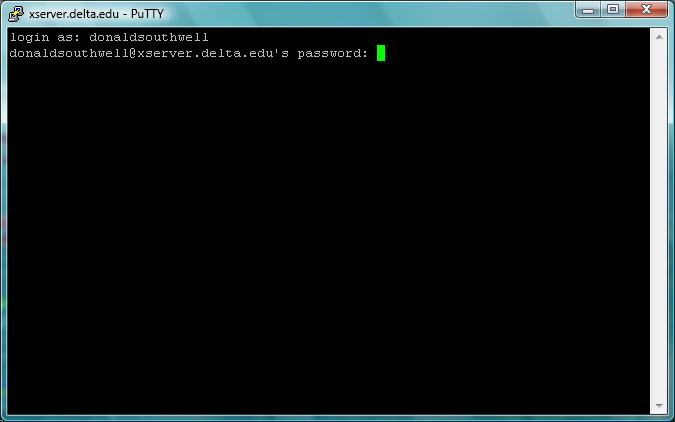
Warning: Linux (and Unix) are case sensitive - IDs and passwords are typed in lower case and you will not see anything happen on the screen when you type your password. Also, if you mess this up too many times, you'll probably be locked out of the system and have to call the helpdesk and get your ID reset. Do it right the first time!

Once you get logged in, you'll be presented with a $ prompt. This means you are ready to enter commands in the Linux system.

Type 'exit' to leave.


Documentation

For more in-depth knowledge of PuTTY, see the PuTTY Documentation Page